From Cooperider on how to repair core.
http://voices.yahoo.com/how-repair-damaged-balsa-core-old-boat-194125.html
How to Repair a Damaged Balsa Core in Your Old Boat
 Coop
Coop,
Yahoo! Contributor Network
Feb 14, 2007 "Share your voice on Yahoo! websites.
There are many affordable old fiberglass boats on the market. Some for as little as a few hundred dollars. Usually these have some kind of damage. Most need repainted, some have a plywood floor that has gotten soft, and needs replaced. Sometimes, when you get that plywood floor removed you notice more damage. This is the point where most people give up and you can get that boat cheap. What they find, is damage to the core of the outer hull. In most cases it is easy to fix, and hey, you already have the floor out of the way so why not. There are different core materials used in the production of fiberglass boats. It is there to increase the thickness of the hull, while trying to keep the weight of the boat to a minimum. One of these core materials is end grain balsa. Yes, the same balsa you used to make model airplanes. But end grained balsa is a highly processed ultra light wood. It give stiffness to the hull. End grained balsa cored hulls have the ability to handle excessive loads.
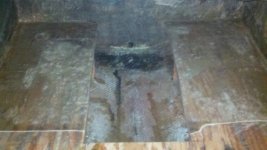
But sometimes water does find its way between the layers of a fiberglass hull and the core starts to rot. It is a good idea to find the source of the rot, usually it can be traced to a screw that was run through the hull, or a hole that was cut through the hull that was not sealed properly. Water finds its way in and you have rot. I have seen boats almost forty years old with no rot, and boats less than 10 years old that are almost unusable due to excessive rot of the floor and the core. I'm sorry some boats are just doomed from the start. But if you find that old classic boat, don't give up on it just because you find it has some balsa core rot. It can be fixed.
Here is how you fix bad balsa.
1. Figure out how big of an area needs repaired, and draw a mark a few inches beyond it.
2. Use some sort of cutting wheel that you can set how deep you are cutting. I have used a circular saw for this, until I found better tools it works great. Set your depth at about 1/4inch or less, and cut around the area you have marked.
3. Use something to pry under the edge of the glass. The only thing holding the glass down would be the good balsa that is still there. The rotten balsa should give way quite nicely.
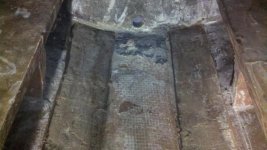
4. Set the piece you cut out aside to use as a pattern for new glass. Make your new pieces. Make at least one piece the same size, and the rest a few inches bigger. Use either heavy roving or biaxial cloth.
5. Use a wide wood chisel and a hammer to chip away all the balsa that is exposed. Try to get as much out as you can before you break out the grinders. Its rotten, it should come out easy.
Go to someplace like
www.fibreglast.com and order some new balsa. If you cant find any locally.
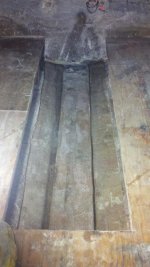
6. Use a sander or a grinder to clean up the inner skin.
7. Cut 2 pieces of 1-1/2 ounce fiberglass mat. The same size as your repair area.
8. Have your glass and balsa precut, then use your brush and wet out the repair area with resin. Then lay one of the pieces of 1-1/2 ounce mat on some cardboard and wet it down with resin, then take it and place it down in your repair area, and brush out all LARGE air bubbles. Don't worry about any small ones, as they don't matter for what you are doing.
9. Take your precut balsa and brush resin on the side that does not have the fabric holding it together, then quickly place it in the repair area over the still wet glass mat that you just placed in there. Use your hands to press it in as best as you can. After you get it in place. Take some wax paper and cover the entire repair, then cover that with cardboard. Place any kind of weight you can find on top of the card board. Books, magazines, newspapers, anything.
10. Now walk away for at least 2 hours. Have lunch, drink a wobbly pop, what ever you want, just leave it alone for at least 2 hours.
11. Now remove the weights, the cardboard, and the wax paper should have kept the cardboard from sticking, you are ready to continue.
12. Use a filler like dura-glass to fill in around the repair area, there will be some gaps between the old area and the new area. Fill these areas flush with the level of the new balsa, don't fill them to the level of the old glass layer. Let this set up. Then sand smooth if needed.
13. Brush a layer of resin onto the new balsa over lapping onto the old glass. Wet the other piece of 1-1/2 ounce mat on the cardboard again, then place the mat onto the repaired area. Brush out the LARGE air bubbles ONLY right now. Take the piece of biaxial glass or roving, that is the same size as the repair and wet it out on the cardboard. Then place it on top of the still very wet mat. Use a plastic or rubber squeegee to work all the air bubbles to the sides and out. Do this as good as you can.
14. Take the last piece of biaxial or roving and wet it out on the cardboard, the place it over the still wet glass you just laid down.
Use a squeegee to work all the air bubbles to the sides and out. Keep working at it until all the air is gone or the resin starts to set up.
15. Drink another wobbly pop, cause you just fixed your boat.

 ... Does the balsa get adhered to the shell first??