• Welcome to the Checkmate Community Forums forums.

    You are currently viewing our boards as a guest which gives you limited access to view most discussions, articles and access to our other FREE features.
    By joining our free community you will be able to:

    » Interact with over 10,000 Checkmate Fanatics from around the world!
    » Post topics and messages
    » Post and view photos
    » Communicate privately with other members
    » Access our extensive gallery of old Checkmate brochures located in our Media Gallery
    » Browse the various pictures in our Checkmate photo gallery

    Registration is fast, simple and absolutely free so please, join our community today!

    If you have any problems with the registration process or your account login, please contact support by clicking here or by using the"contact us" link at the bottom of the page.

Another bravo one gimbal ring solution...

ndaniels

Well-known member
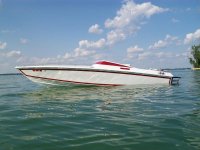
My new to me Superboat had a gimbal ring that was in real bad shape, so I started to look around and read about solutions... came across Ron Bender's name on offshore only (www.jrmarine.com). I talked to one of my Superboats previous owners and he repaired a twin engine boat with Ron's way- both sides... he said it worked great and waaayyy better than pulling the mota.

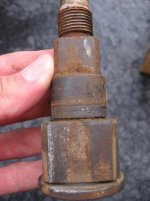
I called Ron, talked to him about it- decided to have him do it. I brought the boat up to him...he is just east of Cleveland, 3hr drive for me... he replaced my gimbal that was cracked in 3 places, swivel shaft, tiller arm, swivel pin, bushing, seals, etc. He did great work and was quick... found a few things I might have overlooked- like the loose/worn tiller arm.

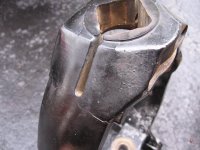
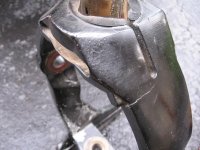
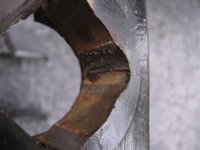
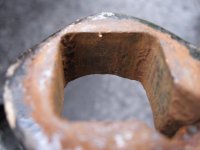
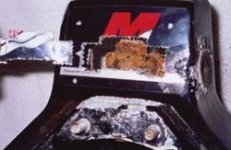
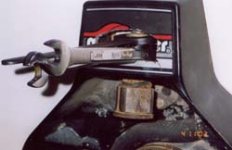
Here are a few photos of the old ring- pretty scary:
 

Attachments

  • IMG_1229.jpg
    IMG_1229.jpg
    63.2 KB · Views: 89
  • IMG_1230.jpg
    IMG_1230.jpg
    62.1 KB · Views: 84
  • IMG_1236.jpg
    IMG_1236.jpg
    43.4 KB · Views: 82
Photo of the swivel shaft, and tiller arm- you can see where the tiller arm was not contacting it squarely.
 

Attachments

  • IMG_1235.jpg
    IMG_1235.jpg
    80.1 KB · Views: 69
  • IMG_1234.jpg
    IMG_1234.jpg
    38.2 KB · Views: 71
What the repair ends up looking like:
 

Attachments

  • IMG_1228.jpg
    IMG_1228.jpg
    47.6 KB · Views: 95
  • IMG_1227.jpg
    IMG_1227.jpg
    62.9 KB · Views: 87
  • IMG_1226.jpg
    IMG_1226.jpg
    74.6 KB · Views: 92
Hopefully this info will end up saving someone on here some money when it comes time for gimbal ring repair... I know it did me!:bigthumb:
 

Attachments

  • 100_0194.jpg
    100_0194.jpg
    58 KB · Views: 44
make sure you keep those two nuts torqued to spec, that's how the gimbles start to wear in the beginning.
 
so, what exactly did he do thats different, im not too up on the gimble repairs/replacements.
go photos though
 
He cuts a hole in the outer transom assy to acess the nut on the swivel shaft... there is a template that goes on to guide you... you can see what you're doing and get wrenches in there... mercury uses a couple of holes on the side and a hammer/punch along with a specially designed nut that goes on with a punch... you're working blind that way... the other way to acess it is to pull the motor and remove the transom assy... big $$$$. Also Ron will repair you're old gimbal ring, as long as its not cracked like mine was... and its a repair that will last.

Couple of pics from the instructions:
 

Attachments

  • Step3.jpg
    Step3.jpg
    13 KB · Views: 59
  • Step8.jpg
    Step8.jpg
    16.7 KB · Views: 64
  • Step11.jpg
    Step11.jpg
    14.1 KB · Views: 65
Back
Top