• Welcome to the Checkmate Community Forums forums.

    You are currently viewing our boards as a guest which gives you limited access to view most discussions, articles and access to our other FREE features.
    By joining our free community you will be able to:

    » Interact with over 10,000 Checkmate Fanatics from around the world!
    » Post topics and messages
    » Post and view photos
    » Communicate privately with other members
    » Access our extensive gallery of old Checkmate brochures located in our Media Gallery
    » Browse the various pictures in our Checkmate photo gallery

    Registration is fast, simple and absolutely free so please, join our community today!

    If you have any problems with the registration process or your account login, please contact support by clicking here or by using the"contact us" link at the bottom of the page.

96 185 Pulse restoration.

You'd think if you were going to take this much time to build a tow pole rather then buy something from Checkmate made for the boat to tow with you'd take a extra minute to seal the holes you drilled in the floor befroe screwing in lag screws and maybe try and make the thing you welded on half a day - look half azzed decent at minimum... :brickwall:

IMG_0030.jpg


IMG_0019.jpg

IMG_0031.jpg

IMG_0021.jpg

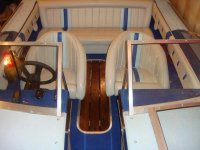
Nice skibar lol, I can't believe how some people treat there stuff, good to see it's now in good hands, here's a few pic's of my 89' all original carpet and interior.
 

Attachments

  • 09 pics 077.jpg
    09 pics 077.jpg
    53.5 KB · Views: 32
  • 09 pics 075.jpg
    09 pics 075.jpg
    38.3 KB · Views: 28
  • 09 pics 106.jpg
    09 pics 106.jpg
    63.4 KB · Views: 34
here's the aluminum skibar base that I made
 

Attachments

  • 09 pics 124.jpg
    09 pics 124.jpg
    42.7 KB · Views: 44
  • 09 pics 107.jpg
    09 pics 107.jpg
    63 KB · Views: 41
Well I decided there were far too many low spots in the skin from factory so I filled some with Everglass short strand filler.

Origally I thought I'd put a layer of CSM against the hull skin after the filler but I'm wondering if that would be overkill for this boat ????? Still plan on using the P2 Premium adhesive to attach the transom to the hull so what do you guys think? Add the layer of mat or just trowel on the adhesive and clamp it up? I am adding mat to the bildge area since I got a little carried away in spots with the grinder..

Cutting transom tomorow and getting it ready to set next weekend.

P1010822.jpg
 
Man, that's CRAZY! I thought I had issues when I did the resto on my'92! You're goin' BALLSOUT! My transom was cherry when we drilled it for the new power. I did'nt think a 9'96 could get as tore up as that! DAMN! Are you thinking about a new interior 'cause mine from the factory came out perfect. Of course, there were a couple of tweaks to deal with, but it's SWEET!
 
ST if you filled in the low spots on the transom skin then you wouldn't/shouldn't need a layer of mat. I added a layer of mat to mine because of all the extra holes; trim tabs,swim platforms and at one time it held twins on the back. Then from the outside I finished filling those holes in. Also it was added insurance just in case I missed any. Remember I've got a 24" gil bracket holding the mota on as well.:D
 
ST if you filled in the low spots on the transom skin then you wouldn't/shouldn't need a layer of mat. I added a layer of mat to mine because of all the extra holes; trim tabs,swim platforms and at one time it held twins on the back. Then from the outside I finished filling those holes in. Also it was added insurance just in case I missed any. Remember I've got a 24" gil bracket holding the mota on as well.:D

Yea this won't be no extreme set-up. :D Maybe a jackplate/set-back but I'll keep it in it's rated range HP wise. I know, boring! ;)
 
Wish I would have made a bit better fit cutting the transom.. Don't know how I ended up with the gap I did as I was shooting for 1/4" at most..

P1010830.jpg
 
Glassed in but I forgot to get a measurment on the horizontial suppor piece..:irked: Anyone know how far it is from the pad inside the boat to the bottom of the support piece on the Pulse? Want to get started building my knees and need to figure out this measurment somehow as if it's to high it'll be in the way of the splashwell.
Should have wrote this down! :(

P1010832.jpg
 
The gap is no biggy as long as you got it sealed up, it's hard to cut a perfect transom. The horizontal brace is just under the splashwell or at least my 170 Pulse was that way. I don't remember the measurement, but I think it was in the middle of the transom. The resto looks great!!!:thumb:
 
Nice work!!! you're really moving along. Very similar rebuild to what I did on my enticer, any idea what you have planned for knees? gonna bulk them up or just go with what CM had?
 
The gap is no biggy as long as you got it sealed up, it's hard to cut a perfect transom. The horizontal brace is just under the splashwell or at least my 170 Pulse was that way. I don't remember the measurement, but I think it was in the middle of the transom. The resto looks great!!!:thumb:


From a earlier pic I took I can see it's maybe a inch above the transom tie down eyes so I should be safe as I remember there being probably two inches of bondo between the splash well and the brace.


Nice work!!! you're really moving along. Very similar rebuild to what I did on my enticer, any idea what you have planned for knees? gonna bulk them up or just go with what CM had?

Moving along slow but sure. Nice to construct something on it rather then destruct something.. ;)
I'm not adding the foam floatation boxes back in there that's for sure, though I'm thinking of building in the box about 8" high for storage and adding knee plates there as well to beef the transom up as I am planning on adding setback to it with a jack plate. That way if it ever sells it'll give the owner lots of power choices without a worry. The knee plates tied to the stringers will be simular to CM's design. Thought about using the previous foam location for a battery on each side but I'm leaning to installing them under the bow seating with a battery switch close by. My thinking is better weight distribution with dual batteries in the bow. What do you guys think? I

I'm definetly gonna take some time and go thru as many retore pics as possible on this forum as the talent and great ideas you can get from this forum are incredible! Hopefully I'll get the transom support cut and set this next weekend along kick plates and rear stringers. Working forward is always better then backwards! :D
 
ST if I'm not mistaken the 185 is a heavy boat someone correct if I'm wrong. That being said if you move the batteries up front, the bow would have a hard time getting air. Most guys add batteries on the passenger side to balance the boat out it hepls on solo runs as well.
 
ST if I'm not mistaken the 185 is a heavy boat someone correct if I'm wrong. That being said if you move the batteries up front, the bow would have a hard time getting air. Most guys add batteries on the passenger side to balance the boat out it hepls on solo runs as well.

x2, the only reason you might want to put them up front is if you were hanging a 300 on the back, which I don't think your doing, right?
 
BTW, does anyone know what Checkmate used to lay in and bond their stringers to the hull initially? Looks like the same stuff that they used for filler.
I'm impressed with how well that stuff bonded and held.
 
Back
Top