-
Welcome to the Checkmate Community Forums forums.
» Interact with over 10,000 Checkmate Fanatics from around the world!
You are currently viewing our boards as a guest which gives you limited access to view most discussions, articles and access to our other FREE features.
By joining our free community you will be able to:
» Post topics and messages
» Post and view photos
» Communicate privately with other members
» Access our extensive gallery of old Checkmate brochures located in our Media Gallery
» Browse the various pictures in our Checkmate photo gallery
Registration is fast, simple and absolutely free so please, join our community today!
If you have any problems with the registration process or your account login, please contact support by clicking here or by using the"contact us" link at the bottom of the page.
You are using an out of date browser. It may not display this or other websites correctly.
You should upgrade or use an alternative browser.
You should upgrade or use an alternative browser.
96 185 Pulse restoration.
- Thread starter SunTime
- Start date
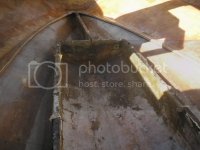
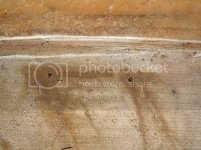
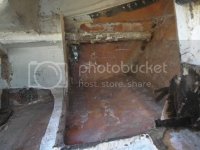
Last for today. A 4" diameter area of transom rot about 3/4 of a inch deep at the worst point is all I can find. (bottom left of picture) Not sure it's enough to totally remove the transom as I think I can fix this to make it as strong as new if not stronger then new. (opinions?) All other boring holes were dry. In this area the fiberglass actually bubbled away from the wood like it went thru a freeze thaw cycle.

bigredinohio
Active member
In my conservative opinion, why chance what you can't see...especially if you're this far into the boat and if you have balsa core and stringer rot!
But then again, I'm no expert. My .02 worth.
By the way, you are doing a great job.
But then again, I'm no expert. My .02 worth.
By the way, you are doing a great job.
I see some black around the tie-downs also. How about the engine mount holes, are all four surrounded by dry light colored wood, or were the bolts surrounded by soft dark/wet wood?
Good eye JW, port side tie down bolts were wet when I pulled out the transom tie downs and starboard dry. This is making my previous thought to pull the deck much easier, as even if I did not have to redo the transom, the rest of the job would be so much easier since I planned on replacing the rub rail/insert and doing some thru bolting and resealing of the shoebox fit anyway. Motor mount holes were all dry. Like on cmpulse170's boat the foam exspecially on the port side was saturated and the foam just happened to be covering the transom tie down bolts. It looks more like I'll have my first crack at replacing a transom.
In my conservative opinion, why chance what you can't see...especially if you're this far into the boat and if you have balsa core and stringer rot!
But then again, I'm no expert. My .02 worth.
By the way, you are doing a great job.
Agree totally, since I have till next summer to complete the project it does make sense since I don't want to cut corners to "get by" so to speak. With a couple months of decent weather left I better get grinding soon!

SunTime,
I was lucky in that my transom was ok. The water was coming in thru the cable boot getting into the foam boxes, mine was a saturated mess.You've made great progress so far.

Yup, I understand the need for flotaion in the under 20' boats but if they just waterlog before the sinking do they do any good?
Work will slow the restoration but I'll post as we go. Decided to pull deck and do the transom and all and also to enable me to get rid of the rest of that flotation foam all along the gunnel much easier..
The 10,000 rivets I think they used in the shoebox fit will be replaced with thru bolts/locking nuts thru a backing plate and my plan is to fill all current holes filled with marine tex before drilling for the thru bolts on the deck to hull joint.
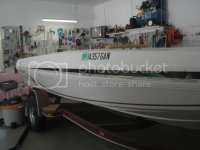
The 10,000 rivets I think they used in the shoebox fit will be replaced with thru bolts/locking nuts thru a backing plate and my plan is to fill all current holes filled with marine tex before drilling for the thru bolts on the deck to hull joint.

Air chisel, hammer with various chisels, punches, etc was used to break loose ALL the bondo I could possibly get at, at the splashwell.
Obviously without cutting into the splashwell there was no way to get at all the bondo, so instead of cutting into the deck itself I used a hydraulic jack blocked inside the hull under the splashwell to break the bond between fiberglass and the bondo itself. A 2X6 about 3' long was used going across the splashwell from corner to corner at the front of the splashwell. I'd move the jack from one side to the other, each time putting just enough pressure on the deck until I'd just start to hear some not so pleasent sounds of something giving! After moving the jack about 4 times back and forth it finally gave way and popped loose with no fiberglass/gelcoat damage at all.


In the middle of the last picture you can see how much bondo I was unable to get at unless I'd cut into the well itself which I wanted to avoid.
Once I get a few bodies aound here to help move the deck to some saw horses it's going to make everything so much easier to do.
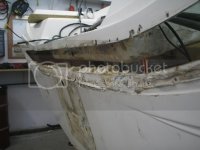
Obviously without cutting into the splashwell there was no way to get at all the bondo, so instead of cutting into the deck itself I used a hydraulic jack blocked inside the hull under the splashwell to break the bond between fiberglass and the bondo itself. A 2X6 about 3' long was used going across the splashwell from corner to corner at the front of the splashwell. I'd move the jack from one side to the other, each time putting just enough pressure on the deck until I'd just start to hear some not so pleasent sounds of something giving! After moving the jack about 4 times back and forth it finally gave way and popped loose with no fiberglass/gelcoat damage at all.


In the middle of the last picture you can see how much bondo I was unable to get at unless I'd cut into the well itself which I wanted to avoid.
Once I get a few bodies aound here to help move the deck to some saw horses it's going to make everything so much easier to do.

Finally got around to moving the deck onto a couple sawhorses that I put casters under to allow me to easily move the deck out of the way, or push outside once I start wet sanding the deck.

Next up is to remove the rest of the flotation foam. Then I plan to remove the transom and then it'll be grinding time..
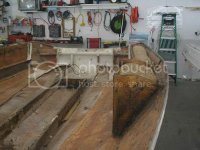

Next up is to remove the rest of the flotation foam. Then I plan to remove the transom and then it'll be grinding time..


hotdaddy27
Well-known member
Wow!
You have come a long way in 3 weeks SunTime. Keep it up.
The Checkmate O/B's are a ton of fun (as are the I/O's ).
).
Good luck! I think you got it for a fair price.
You have come a long way in 3 weeks SunTime. Keep it up.
The Checkmate O/B's are a ton of fun (as are the I/O's
 ).
).Good luck! I think you got it for a fair price.
cooperider
Well-known member
Looking good so far. Nice job.
yellowfiero88
Well-known member
Looks like you are a pro at this!! Keep up the good work.
BTW your garage makes me sick. I have never had that clean of a garage while a project is going on! Even your work bench is clean, LOL!
BTW your garage makes me sick. I have never had that clean of a garage while a project is going on! Even your work bench is clean, LOL!
ST any updates?
Not much at all cm, been putting in a lot of hours at work so it's put a hurt on doing much. In this economy though I'm not going to complain about working long hours!! I have till next spring to get er done.
I did manage to get it off the trailer and onto some dollies last weekend to make everyting a bit easier. This weekend will likely be dedicated to my Sunsation getting her ready for her long nap!

I'll update soon I hope!
Looks like you are a pro at this!! Keep up the good work.
BTW your garage makes me sick. I have never had that clean of a garage while a project is going on! Even your work bench is clean, LOL!
I'm fanatical at keeping everything clean and as perfect as possible.. It at times is a very bad obsession that interfers with play time!
 Once done with the 186 you'll be able to eat off it anywhere including the bilge..
It's a sickness I tell ya!

Well finally got a day to strat getting after it again and remove the transom. Air Chisel and prybars seemed to work the best as I wanted to save at least the inner piece of plywod for a temp plate.

Things looking a lot worse then I intially thought as the transo sounded sound but the picture tells the story of a negected boat and suspect installation from factory. Must have been allowed to sit uncovered a LOT considering the year.

You can't see them in this pic but there muct have been 25 staples at least fastening the transom sheets together.

Best way I could tear it all out. This hull has been in my garage since I started this progect and the transom is STILL wet inspots.

Only stuck in about half the area at the skin of the hull.


Weather permiting I'll wheel her outside next weekend and start grinding and sanding in preperation to install the new transom. No way I'll be doing that inside!

Things looking a lot worse then I intially thought as the transo sounded sound but the picture tells the story of a negected boat and suspect installation from factory. Must have been allowed to sit uncovered a LOT considering the year.

You can't see them in this pic but there muct have been 25 staples at least fastening the transom sheets together.

Best way I could tear it all out. This hull has been in my garage since I started this progect and the transom is STILL wet inspots.

Only stuck in about half the area at the skin of the hull.


Weather permiting I'll wheel her outside next weekend and start grinding and sanding in preperation to install the new transom. No way I'll be doing that inside!

