• Welcome to the Checkmate Community Forums forums.

    You are currently viewing our boards as a guest which gives you limited access to view most discussions, articles and access to our other FREE features.
    By joining our free community you will be able to:

    » Interact with over 10,000 Checkmate Fanatics from around the world!
    » Post topics and messages
    » Post and view photos
    » Communicate privately with other members
    » Access our extensive gallery of old Checkmate brochures located in our Media Gallery
    » Browse the various pictures in our Checkmate photo gallery

    Registration is fast, simple and absolutely free so please, join our community today!

    If you have any problems with the registration process or your account login, please contact support by clicking here or by using the"contact us" link at the bottom of the page.

74 Trimate floor restoration

richeyb

New member
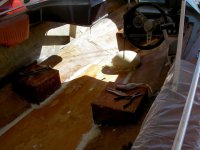
I am in to the second week of a restoration project on my 1974, 16.5 ft open bow Trimate, Checkmate. It has been the familes ski and fishig boat since it came off the show room floor in Bossier City LA. the floor had rotted out and badly needed repair.
I have spent 2 weeks removing the interior and the flooring, and found the stringer totally rotted out. and most of the wood center core rotted...

I have been reading lots of restoration forums and have a good baisc plan in mind to rebuild it back to gold standard... lookig to go with Expoy, on 1/2 exterior plywood... with one elayer of CSM on the bottom and a couple layers of CSM on top with a final layer of woven roving. And using 1708 to tab it in.... not sure on using PL or peanut butter for my padding and filler??
All my reading I am confused on the construction of the Trimate.... It has a single stinger down the middle supporting the floor in the back 10 ft. and the area under the plywood is filled with foam.... Did Checkmate intend for the Stringer and foam area to be water proof with no drainage to the Bliege and drain plug????????? It appears to totally fiberglassed in. and allow the water to drain across the floor to the bliege area.... However some of the artilce I have read talk about adding small daringe holes to allow any water that gets in to drain.

I woudl like to build the floor water proof and not build it to drain just incase I knock a hoel in the hull...

Any smart boat people with Checkmate thoughts????

Richey
 
If you're gonna use epoxy resin then I would go with cabosil mixed with resin for embedding stringers to the hull. The reason the stringers are rotted is because the floor was compromised and water got underneath. Basically all it took was for someone to screw a seat, battery etc to the floor and didn't seal the hole. The reason for the drain holes in the stringers is to allow for water a place to go if the new floor is ever compromised.
 
Yes that was their design fro the time was a sealed compartment, my trimate III was teh same way... unfortunately nothing is every truly waterproof as we have since learned, so when you build it bake make sure it drains!!!
 
Yes that was their design fro the time was a sealed compartment, my trimate III was teh same way... unfortunately nothing is every truly waterproof as we have since learned, so when you build it bake make sure it drains!!!

Looking at the stringer and other support I don't think they either drained or added any fiberglass to cover the wood.

Wouldn't a good covering of epoxy fiberglass add the protection needed to keep the wood dry? Or is my plan for multilayers of glass overkill...?

It would appear to me, by adding a drain hole, your also adding a source for water to get into your foamed subflooring??
Thanks,

Richey

Most of those restorations the guys did here left the foam out. The stringers and floor need to be encapsulated with resin and mat prior to installing those parts. Once you do that then add a layer of resin and mat to seal the floor in place.
 
Foam Question

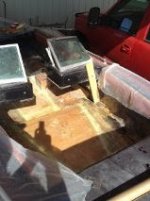
I'm well on my way to getting my floor in.... Stringer installed, epoxied in place. and sealed in fiber glass... 1/2" plywood also incased in glass and then glued to stringer with peanut butter.. the floor was 9' long, using a 8 ft piece of plywood, left a 1 ft opening at front of floor....I had planned to tip the boat up as far as I could and our in the chemicals and let it foam filling in the open space.
I mixed up a cup of chemicals, instantly providing me more foam than I could imagine... the instructions said I needed equal parts and then stir for 25 seconds and it will take 25 minutes to react and expand to its capacity.... after 25 seconds it started foaming and boiling out of my cup... I raced to my boat, dripping foam along the way and poured it into the front opening hoping it would drain to the back before expanding... not sure how far back it went but it sure foamed out the front making a ball the size of a basket ball ozzing out....

Next effort will be the cut some holes along the stringer and pour in small portions of foam and see what happens...

I can seee why boat resotrations don't replace the foam, what a pain..

Any suggestions?????????

Had a vision of putting 2 chemicals in a water bottle and shaking it up and then sticking the bottle against a hole in the floor and letting it shoot into the hull...?? but my luck the bottle would explode????????????????

Richey
 
Myself, I wouldnt bother with the foam, just a place to trap water. Keep more then enough life jackets in the boat, you will be fine. If you have time and its going down, tie a long rope to a few life jackets to make it eaiser to find. Make sure you insurance is paid.
 
I made forms and poured the foam into cubes that fit against the transom around my fuel tank. They don't allow new boat builders to put it under the floor any more because it flips the boat. I had the deck off my boat and found that I could flip it and pour it between the braces. Good luck:thumb:
 
Foamed Floor

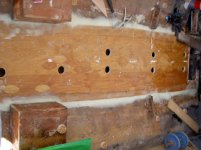
I went ahead and put my vision to the test and it worked. I was able to drill 8 2inch holes, about 11/2 ft apart along the new floor.

PICT3436.jpg

Then set up my mixing area in the boat and poured about an inch of mixture A and B into a clean plastic pop bottle
PICT3438.jpg

and shook it hard, capping the end with my gloved hand.
PICT3440.jpg

After shaking it for 20 seconds and it started to foam I put the neck of the bottle into a hole and let it pour in
PICT3441.jpg
It would fill about a holea nd 1/2 and after 15-30 minutes it would start to expand out the hole. I would then place a board over it and let it expand on down the floor.
After if was cured I cut it off and dug out enough foam to allow me to fill the hole with peanut butter. I then repalced the holes I had cut out. and scrapped it smooth. and then finally sanded it flush ready to apply the layers of fiber glass to complete the floor!! yea..
PICT3443.JPG


Came together much easier than I had imagined.
Thanks for the help and suggestions. Another couple weeks and I'll have the front floor finsihed..... cold front hit yesterday and now I'm waiting on warmer weather to make sure the foam, foams... they suggest 80+ degrees...

More pictures can be found at https://picasaweb.google.com/112161761174021132581/BoatRestor12?locked=true#5781909867816750226

Richey
 
Finished, Yea

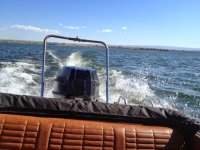
Finally completed a year of restoration and got my boat in the water last Saturday and I’m glad to say the boat ran and road great.
Back%2520View.jpg
Back%2520vView%25207%25206%252013.jpg

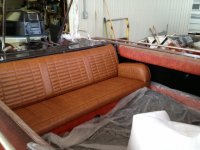
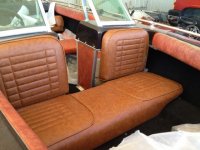
If you start at the first of my post you will see my floor had rotted out and need to be replaced. Also found that the front and back seating areas needed to be totally rebuilt. I spent the winter doing the floor and seats, carpeting and then waiting for the upholstery to be finished so I could put the seats. The carpeting was fairly easy using the old carpet as a template and just cutting the new to match. I did find that the carpet glue I had order through Overton’s had set on the shelf too long in the barn and had turned to a liquid and was not good. It had probably gone through freezing and heating and cooling in the barn over the year and I wasn’t about to argue about a warranty. I just ordered another tub of glue and pressed on. I finished the floor and carpet in the winter, but it ended up being another 4 month wait getting the upholstery. But I did discover that all the seat foam was in perfect condition and I could reuse. I also found a Marine Upholstery pneumatic staple gun and stainless steel staples on the internet (http://thejetskistore.com/marine-upholstery-stapler-kit ) I ended up order extra staples and the entire package was well worth the expense ($89). I can’t imagine doing the upholstery with a conventional stapler or with tacks. Plus I needed to insure they were stainless steel staples. The one thing that did require experimentation was the pressure setting. I started at 90 PSI and the staple went right through the vinyl. I lowered it to 75 PSI and it went into the glassed wood and not through the vinyl. Stretching the vinyl was the toughest and most time consuming effort. I first would lay the vinyl out in the sun and heat it for about 30 minutes. On the big front and back benches I could handle it by tacking the middle and then alternation away and stretching as I tacked down. The power stapler made it easy to hold with one hand and staple with the other.
Back%2520Seat.jpg
front%2520seat.jpg


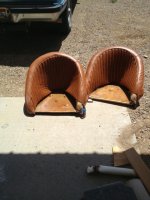
However on the Captain Seats it was harder to do solo. In fact for the last one I called for help and had a friend help hold we both pulled to get the back stretched tight and the inside corner pulled were I could staple it. Once the center was stapled and the two corners stapled it was fairly easy to stretch the inside and outside and tacking it down. Here are some pictures of my finished product. You’ll notice the color of vinyl isn’t close to matching the original orange from Checkmate. They said their distributor from 1974 no longer was in business and so my marine upholstery shop just found a nice vinyl that had a good grainy appearance and they came out looking very nice. Next winter I plan on replacing the bumper pads I had left as the original orange.
Cap%2520Seats.jpg
Captian%2520seat.jpg

Richey
Checkmate Trimate 16.5' 115 Evinrude
 
You have given me encouragement for when I do my upholstery.

Also---had you considered or heard of anyone else but me using PVC board for the stringers etc.??? No rot, imperious to water and machines like wood.
 
You have given me encouragement for when I do my upholstery.

Also---had you considered or heard of anyone else but me using PVC board for the stringers etc.??? No rot, imperious to water and machines like wood.

No don't remember in all my research hear of PVC for stringer?

I do highly recommend to anyone attempting tHe upholstery to get a phnumatic ataple Gina dn stainless steelmstLes. It real made the job easy and allows ou to adjust the pressure.
 
Back
Top